17.9 Настройка Smart Link
17.9.1 Введение в функцию
Smart Link — простая, но практичная технология быстрой защиты соединений. Она является решением для сетей с двойным восходящим каналом, обеспечивающим резервирование и быструю миграцию активных и резервных каналов.
Каждая группа Smart Link включает пару интерфейсов второго уровня, где один интерфейс настроен как резервный для другого. Эта функция предоставляет альтернативу STP (Spanning Tree Protocol). Пользователи могут отключить STP и при этом сохранить базовое резервирование соединений. Функция также поддерживает балансировку нагрузки, что позволяет обоим интерфейсам одновременно передавать трафик.
17.9.2 Конфигурация
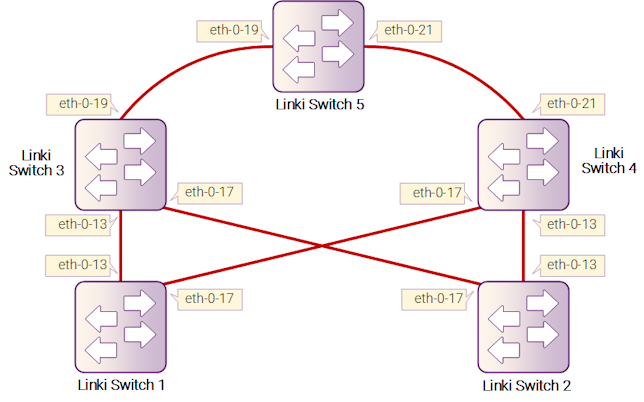
Рисунок 17-17 Типичная топология Smart Link
На приведенном выше рисунке изображено типичное применение Smart Link. Switch1 и Switch2 настроены как группа Smart Link. Switch3, Switch4 и Switch5 настроены как получатели пакетов сброса Smart Link.
Для настройки группы Smart Link предварительно необходимо выполнить следующие конфигурации:
- Настроить VLAN.
- Настроить экземпляры MSTP.
- Отключить протокол spanning-tree на интерфейсе.
- Подробнее об этих настройках см. в соответствующей документации.
Следующие команды должны выполняться на всех коммутаторах, если идентификатор коммутатора не указан.
Шаг 1: Вход в режим конфигурации
Switch# configure terminal
Шаг 2: Вход в режим конфигурации VLAN и создание VLAN
Switch(config)# vlan database
Switch(config-vlan)# vlan 2-20
Switch(config-vlan)# exit
Шаг 3: Установка режима spanning tree и создание экземпляров MSTP
Создание экземпляров MSTP на Switch1 и Switch2:
Switch(config)# spanning-tree mode mstp
Switch(config)# spanning-tree mst configuration
Switch(config-mst)# instance 1 vlan 1
Switch(config-mst)# instance 2 vlan 2
Switch(config-mst)# instance 3 vlan 3
Switch(config-mst)# instance 10 vlan 10
Switch(config-mst)# exit
Шаг 4: Настройка интерфейсов
Настройка интерфейсов на Switch1 и Switch2:
Switch(config)# interface eth-0-13
Switch(config-if)# switchport mode trunk
Switch(config-if)# switchport trunk allowed vlan all
Switch(config-if)# spanning-tree port disable
Switch(config-if)# no shutdown
Switch(config-if)# exit

Switch(config)# interface eth-0-17
Switch(config-if)# switchport mode trunk
Switch(config-if)# switchport trunk allowed vlan all
Switch(config-if)# spanning-tree port disable
Switch(config-if)# no shutdown
Switch(config-if)# exit
Настройка интерфейсов на Switch3 и Switch4:
Switch(config)# interface eth-0-13
Switch(config-if)# switchport mode trunk
Switch(config-if)# no shutdown
Switch(config-if)# switchport trunk allowed vlan all
Switch(config-if)# smart-link flush receive control-vlan 10 password simple test
Switch(config-if)# exit

Switch(config)# interface eth-0-17
Switch(config-if)# no shutdown
Switch(config-if)# switchport mode trunk
Switch(config-if)# switchport trunk allowed vlan all
Switch(config-if)# smart-link flush receive control-vlan 10 password simple test
Switch(config-if)# exit
Настройка интерфейса eth-0-19 на Switch3:
Switch(config)# interface eth-0-19
Switch(config-if)# switchport mode trunk
Switch(config-if)# no shutdown
Switch(config-if)# switchport trunk allowed vlan all
Switch(config-if)# exit
Настройка интерфейса eth-0-21 на Switch4:
Switch(config)# interface eth-0-21
Switch(config-if)# switchport mode trunk
Switch(config-if)# no shutdown
Switch(config-if)# switchport trunk allowed vlan all
Switch(config-if)# exit
Настройка интерфейсов на Switch5:
Switch(config)# interface eth-0-19
Switch(config-if)# switchport mode trunk
Switch(config-if)# no shutdown
Switch(config-if)# switchport trunk allowed vlan all
Switch(config-if)# smart-link flush receive control-vlan 10 password simple test
Switch(config-if)# exit

Switch(config)# interface eth-0-21
Switch(config-if)# switchport mode trunk
Switch(config-if)# no shutdown
Switch(config-if)# switchport trunk allowed vlan all
Switch(config-if)# smart-link flush receive control-vlan 10 password simple test
Switch(config-if)# exit
Шаг 5: Создание группы Smart Link и настройка ее атрибутов
Создание группы Smart Link на Switch1 и Switch2:
Switch(config)# smart-link group 1
Switch(config-smlk-group)# interface eth-0-13 master
Switch(config-smlk-group)# interface eth-0-17 slave
Switch(config-smlk-group)# protected mstp instance 1
Switch(config-smlk-group)# protected mstp instance 2
Switch(config-smlk-group)# protected mstp instance 3
Switch(config-smlk-group)# protected mstp instance 10
Switch(config-smlk-group)# load-balance instance 3
Switch(config-smlk-group)# restore time 40
Switch(config-smlk-group)# restore enable
Switch(config-smlk-group)# flush send control-vlan 10 password simple test
Switch(config-smlk-group)# group enable
Switch(config-smlk-group)# exit
Шаг 6: Отключение функции ретрансляции Smart Link
Настройка на Switch5:
Switch(config)# no smart-link relay enable
Шаг 7: Выход из режима конфигурации
Switch(config)# end
Шаг 8: Проверка
Показать результаты на Switch1:
Switch1# show smart-link group 1
Smart-link group 1 information:
 The smart-link group was enabled.
 ============================================================
 Auto-restore:
   state       time            count    Last-time
   enabled      40               0      N/A
 ============================================================
 Protected instance: 1  2  3
 Load balance instance: 3
 Flush sender , Control-vlan ID: 10    Password:test
 ============================================================
 INTERFACE:
 Role   Member    DownCount Last-Down-Time  FlushCount Last-Flush-Time
 MASTER eth-0-13    0       N/A                   0     N/A
 SLAVE  eth-0-17    0       N/A                   0     N/A
 ============================================================
 Instance states in the member interfaces:
   A - ACTIVE ,   B -BLOCK  , D-The interface is link-down
 Map-instance-ID   MASTER(eth-0-13)    SLAVE(eth-0-17)
       1              A                  B
       2              A                  B
       3              B                  A
Показать результаты на Switch2:
Switch# show smart-link group 1
Smart-link group 1 information:
 The smart-link group was enabled.
 ============================================================
 Auto-restore:
   state       time            count    Last-time
   enabled      40               0      N/A
 ============================================================
 Protected instance: 1  2  3
 Load balance instance: 3
 Flush sender , Control-vlan ID: 10    Password:test
 ============================================================
 INTERFACE:
 Role   Member    DownCount Last-Down-Time  FlushCount Last-Flush-Time
 MASTER eth-0-13    0       N/A                   0     N/A
 SLAVE  eth-0-17    0       N/A                   0     N/A
 ============================================================
 Instance states in the member interfaces:
   A - ACTIVE ,   B -BLOCK  , D-The interface is link-down
 Map-instance-ID   MASTER(eth-0-13)    SLAVE(eth-0-17)
       1              A                  B
       2              A                  B
       3              B                  A
Показать результаты на Switch3:
Switch# show smart-link
 Relay smart-link flush packet is enabled
 Smart-link flush receiver interface:
    eth-0-13   control-vlan:10   password:test
    eth-0-17   control-vlan:10   password:test
Smart-link received flush packet number:0
Smart-link processed flush packet number:0
Smart link Group Number is 0.
Показать результаты на Switch4:
Switch# show smart-link
 Relay smart-link flush packet is enabled
 Smart-link flush receiver interface:
    eth-0-13   control-vlan:10   password:test
    eth-0-17   control-vlan:10   password:test
Smart-link received flush packet number:0
Smart-link processed flush packet number:0
Smart link Group Number is 0.
Показать результаты на Switch5:
Switch# show smart-link
 Relay smart-link flush packet is disabled
 Smart-link flush receiver interface:
    eth-0-21   control-vlan:10   password: test
    eth-0-19   control-vlan:10   password:test
Smart-link received flush packet number:0
Smart-link processed flush packet number:0
 Smart link Group Number is 0.